dafni
First analysis (FSL, UNIX, …)
The aim of this session is to analyze the data we acquired with 3T functional MRI in our simple cognitive neuroscience experiment.
In outline, the first steps will be very similar to what you may remember from another course (PSGY4020, Methods), where we had talked through the pre-processing and analysis of a simple data set with FSL.
Can we make to this, today?
What is it? the Faces versus objects scan? or the Fingertapping. What do you think?
The plan for here is:
- copy data across to a directory in your space
- organise data in folders
- start up
Feat_gui & - provide all the necessary info in the GUI interface
- hit
Go!and watch for progress in web browser - dig around in the resulting folders and files
Organise the data into folders
Do this “by hand” - using mouse clicks in the macOS operative system for now. We’ll see how to use command line calls in the Terminal soon. Think about which files are:
- functional data
- anatomical images
- “metadata” - wikipedia entry on this idea
Take 2 minutes with your neighbours to discuss the following
- How can you tell which files refer to which data (in words?)
- What tools / commands could you choose to check / inspect?
fslhas command line tools - What are good ways to keep track of some key information? In the same place? Somewhere else? What are the advantages / disadvantages of those options?
Analysis steps
Create a directory in your home, move data
The OneDrive location of the zip-file (2023/24)
– this will only work for people who have a University of Nottingham User ID. If you haven’t already downloaded these data, do so now and keep track of where the data get stored (~/Downloads ?)
# first an "umbrella" folder, then one for subject 2
mkdir ~/data/
mkdir ~/data/sub-03/

# navigate into data directory
cd ~/data/sub-03/

# COPY the files from
# ~/Downloads/msc-scan/sub-03
# TO here (.)
#
# HOW?
Some initial steps / warm-up
Re-orient the MPRAGE
Orient the MPRAGE image into the “standard” orientation that most tools will expect. This is not always necessary, but if there are issues with “alignment” in your fMRI analysis, this step can sometimes help:
# navigate into data directory
cd ~/data/sub-03/

# identify the MPRAGE image. Use Readme.md or info in json files?
# could use unix `grep` ! [slightly advanced...]
# mine is: ` ???  `

fslreorient2std NAME_OF_MPRAGE_FILE.nii  mprage

# if you want to skipt this step, you could also just cp / rename
imcp NAME_OF_MPRAGE_FILE mprage

# what's the benefit of doing this renaming step / can you see issues?
For our 2022/23 data… the reconstructed files are already in standard space, so the fslreorient2std call will do nothing, really.
Hints on finding filename with grep
The grep utility has several flags that can be useful... use man grep or a judicious google search to help find out how.
flags for grep
Look at this stack overflow post.
Finally... try this:
grep MPRAGE *.jsongrep -i mpRaGe *.jsongrep -i -l mpRaGe *.jsonand there is even a way to capture / save this information, filename... but that's for another time.
- skull strip that anatomy
# inspect, if ok, then skull strip and also make a  mask (-m)
# for the 2023/24 data, we should also use the -B option (!)
bet mprage mprage_brain -m -B
-
look at the images using
fsleyes -
What do you think the following call does. Think about it first, then run it.:
fsleyes mprage mprage_brain -cm red-yellow &
Any comments about what you see for this particular step?
Set up the analysis using the GUI
Start up feat either via the fsl menu or directly.
# navigate into data directory
cd ~/data/sub-03/

# then pick FEAT FMRI analysis
fsl &
# - OR -
Feat_gui &
Key information
- What is the name of the 4D data set? There were two different experiments (a visual and a motor one). How can you tell which one was which?
- Check total volumes and TR are picked up correctly.
- Consider all the options in the Pre-stats tab.
- Registration. We to register to a Main structural image as well as into Standard space.
- if you use the
BBRmethod you need to use the_brain.niiimage we made in a previous step. This method is pretty cool, but if not given the right files it tends to run for a long time [viz infinite]. - Stats. We want to specify a full model. To do this, we need to use the timing information from the experiment. Can you remember what this was?
- Let’s use the Model Setup Wizard button, as our experimental design nicely fits one of the pre-prepared options. Timing??
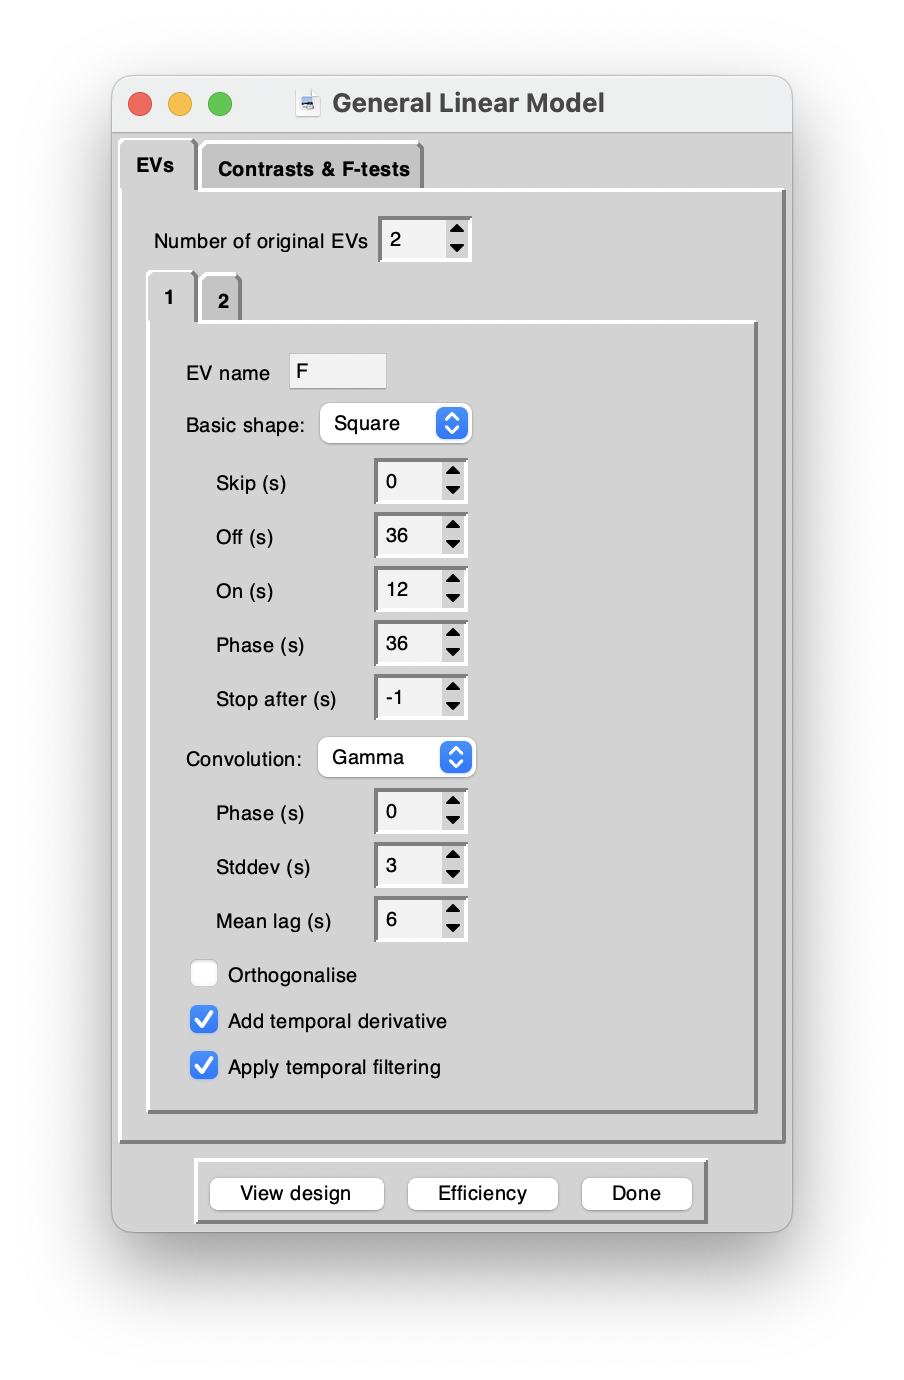
Explanatory variables
For FSL design matrix rules, this means for two EVs and “square wave” settings, you can use the following. I called the two EVs “faces” and “objects”. You can use F and O instead – the calculations will be the same, just the naming in figures, data will obviously be different.
| setting | Faces | Objects |
|---|---|---|
| Skip | 36 | 36 |
| Off | 36 | 36 |
| On | 12 | 12 |
| Phase | 36 | 12 |
| Stop After | -1 | -1 |
| Convolution | Gamma | Gamma |
Contrasts
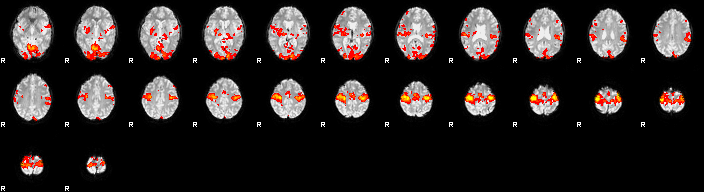
Remember that we were planning to look for regions in the brains of our participants
- (A) where there was a response to any kind of visual stimulus
- (B) where there was a significantly higher response during face presentations than object presentations and
- (C) vice versa: whhich parts of the brain responded more to objects that faces.
The contrasts in the following achieve this. Go back to recordings for some more details

Eye candy
You can also have a quick look at a short demo / tutorial video I made for this first: youtube link
Register onto a nicer image:
# the renderhighres tool!
# get minimal help:
renderhighres

# actually run it:
renderhighres *.feat highres highres 1
You can then look inside the hr directory and look at the files called rendered_thresh_zstat.
Meta-questions
It’s worth taking a step back and thinking about how running through the analysis with the same data set today went & felt like:
- How does this analysis compare to what you did with
spm? - Do you prefer one method/tool over another?
- What do you think the advantages are of using a tool that you run from within a
unixenvironment? Downsides?
Notes from 2023-02-21 session
For details on all the files that get created during running of feat you can also look at this detailed description online.
History of my commands in the shell
ls
imcp sub-03_20230207104025_401.nii mprage
ls
imcp sub-03_20230207104025_301.nii fmri
ls
bet mprage mprage_brain -m
ls
fsl &
more Readme.md
ls
cd fmri.feat
ls
open .
fsleyes &
fsleyes thresh_zstat3 &
ls